


Reader Kitchen Design Project
Hi Maria & team,Finishing up our kitchen facelift and wanted to thank you for all the advice on your blog and in your [eBooks]! I’m just thrilled with how our kitchen came out. It’s my absolute favorite. Still need to choose wall colors (blue) and decorate, but it is SUCH an improvement! From blah to classic.We DIY’ed the stacked uppers (with help from ShelfHelp, Cabinet Doors Now, and a local glass shop), trim on the sides of the island and fridge, and backsplash. Counters are untreated soapstone and honed Carrara marble. Cabinets are painted (w/ conversion varnish) BM Oxford white. Our trim is Chantilly Lace but it felt a little too stark for the whole kitchen. Love the tiniest bit of warmth in Oxford White.Cheers!
5 Kitchen Design Details That Matter
1 | Commit to keeping your kitchen design simple
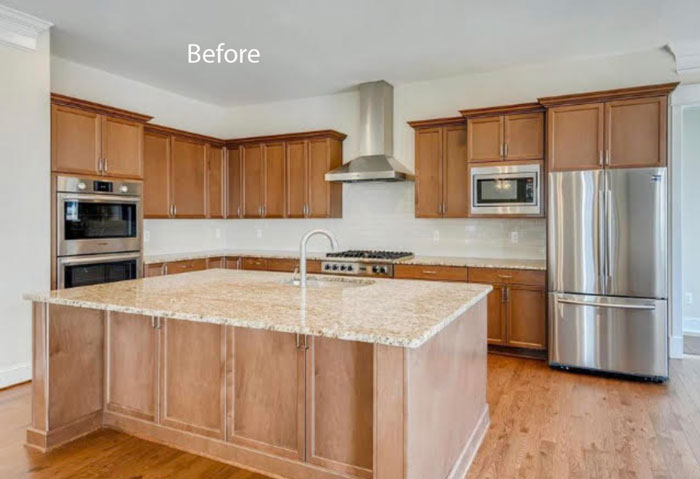
In her kitchen before, she had a standard warm wood stained, builder-grade kitchen with pink beige granite (below).
So many DIYers choose their new kitchen details in isolation – without a plan. And, big box stores make it easy for the average homeowner to choose way too many fussy details like a busy or trendy backsplash that doesn’t relate to their countertops (for example) when refreshing a kitchen.
Read more: What Big Box Stores Don’t Tell You About Your Kitchen Finishes
2 | Don’t Just Paint Your Cabinets; Box in the Gap
Remember, it’s the details that make a kitchen design work.
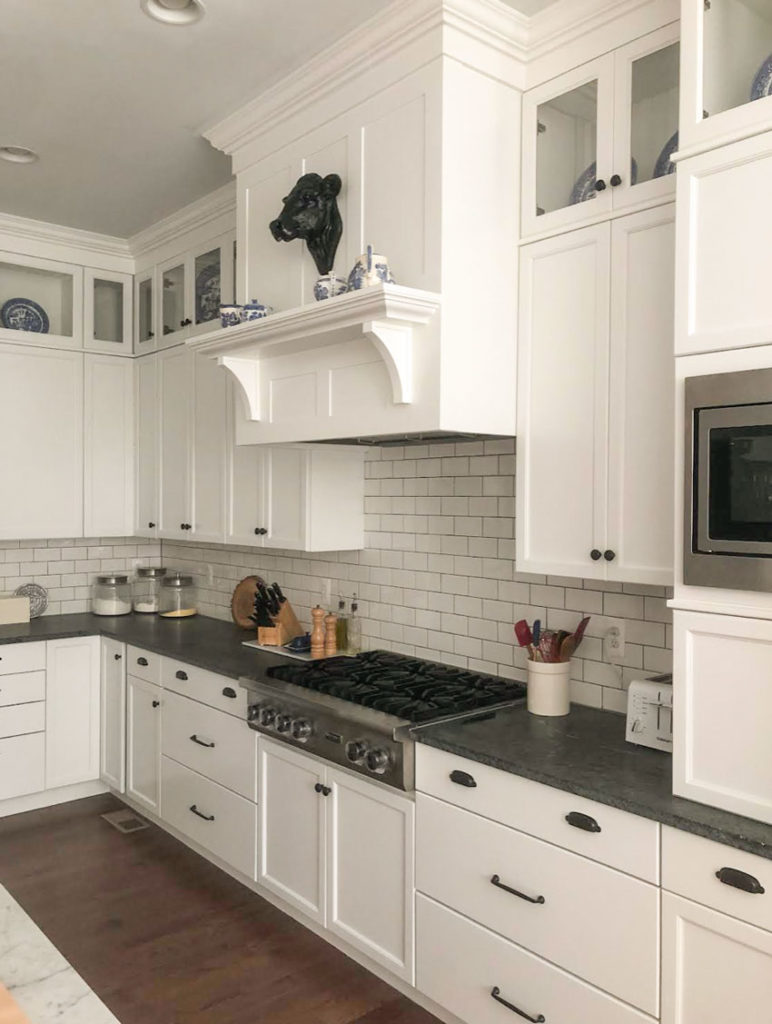
And this is one of those details that really make an impact. By boxing in the gap between the uppers and the ceiling, she kept this kitchen from looking like a “dated kitchen with white painted cabinets.”
Adding upper cabinets all painted a crisp true white with lovely moldings and glass doors for display, is a completely upscale new look! Also, I love the blue and white ceramics on display.
Simple right?
Read more: My Designer Secret for Updating Old Kitchen Cabinets
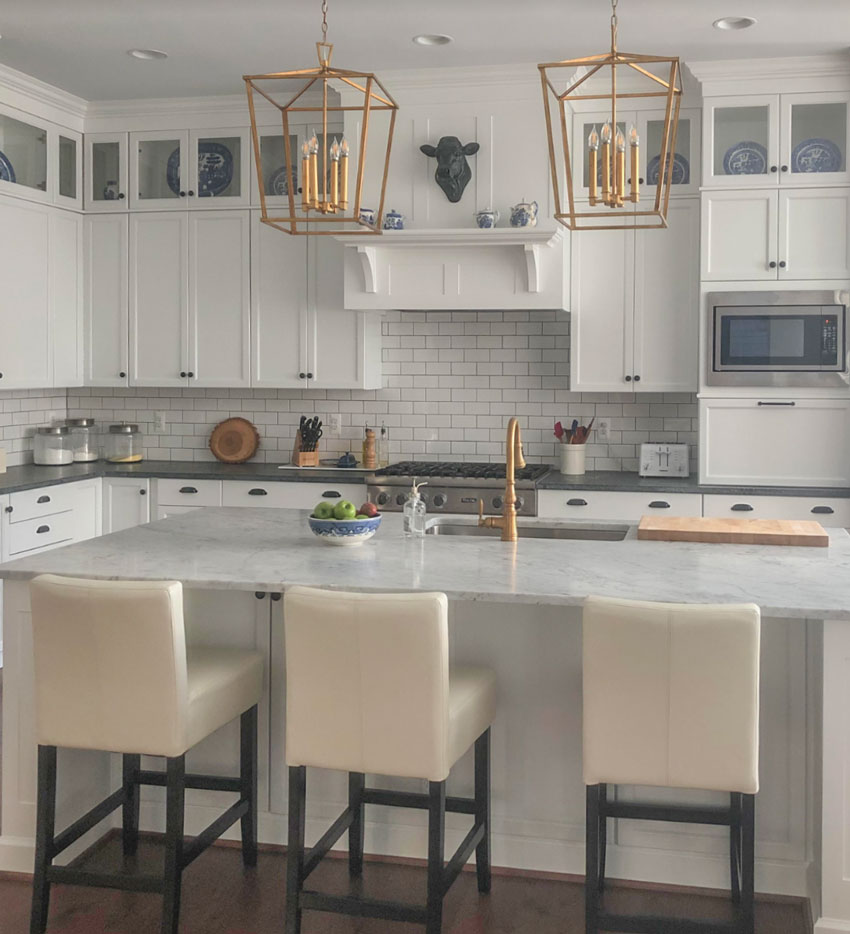
Again, the boxed in uppers and moldings, and the inspired choice to add glass doors for display are amazing… but what really elevates this kitchen design is the beautiful custom hood. It is SUCH a huge upgrade from the standard stainless chimney she had before.
3 | Choose Kitchen Hardware Wisely
The other kitchen design detail I applaud her for is that she avoided the common mistake of installing those generic black 4 or 6 inch black pulls on EVERY cabinet and drawer. Now that the black trend is in full throttle we see this mistake all of the time.
Instead, she opted for a mix with elegant small knobs on the cabinets and bin pulls on the drawers, which looks so much more clean and refined as a whole.
Read more: Less is More for Kitchen and Bath Hardware
Brass faucet | Black cup pull | Black knob
4 | Mix Metals to Provide Dimension and Interest
I also think this is a really great example of the simple principle of mixing metals. She’s pulled it off beautifully here.
The black hardware is repeated in the soapstone countertop and the appliances. Plus, she’s successfully layered in some gold in her pretty lanterns and faucet. I also love how she combined a black cup pull, a regular pull and a knob. Just lovely.
Read more: Is Brass Out? How to Mix Metals like a Pro
This kitchen design would have looked very flat and predictable if EVERY metal detail was black.
Let’s recap that tip because it is so key.
In order to mix metals successfully, make sure that each finish is repeated at least once.
5 | Add Colour
You know what I would add to make this kitchen even more perfect? COLOUR, of course.
This really is the next level of kitchen design and one of those details that can be challenging for the DIY kitchen designer without my colour training. Learn to choose colour like I do.
My reader mentioned she would like to maybe paint the walls blue next. I wholeheartedly agree that some blue paint WOULD be MAGIC in this kitchen!
But because there is little wall space in the kitchen itself, I recommend that she consider adding it to the ceilings. Notice that when the hard finishes are timeless and simple, it’s easy to add colour with your accessories and decor.
And when you tire of blue… it’s an inexpensive update.
I’ve photoshopped a version below with the ceiling painted a cool muted blue and also repeated in the island stools below.
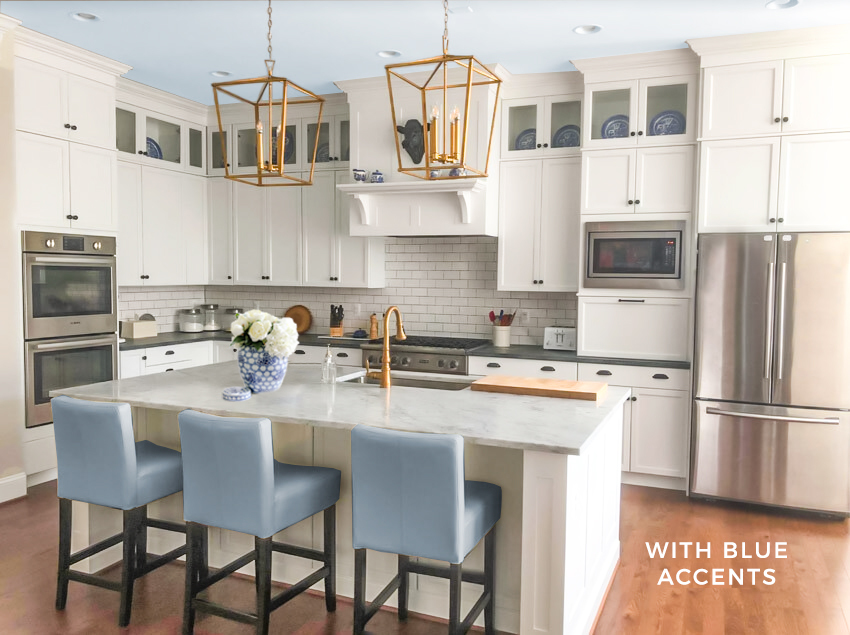
Lantern Chandelier similar here | Ginger Jar similar here and here
The existing stools could be reupholstered, but often it’s best to sell them and buy something new.
And actually, a chair with a bit more interest would be lovely, like this pretty one below:
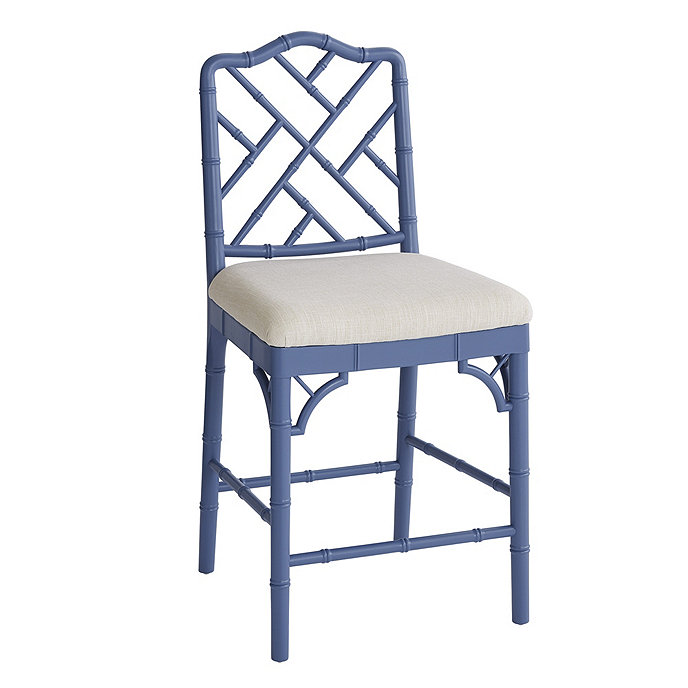
Dayna Stools from Ballard Designs
If you order new stools or fabric, wait for them to arrive before you nail down the specific ceiling colour so you can be sure to get a good match.
Need help choosing colour for decor and accessories when shopping online? I’ve got an online course for that. Trust me, when you start using mood boards for online shopping, it’s a complete #GAMECHANGER.
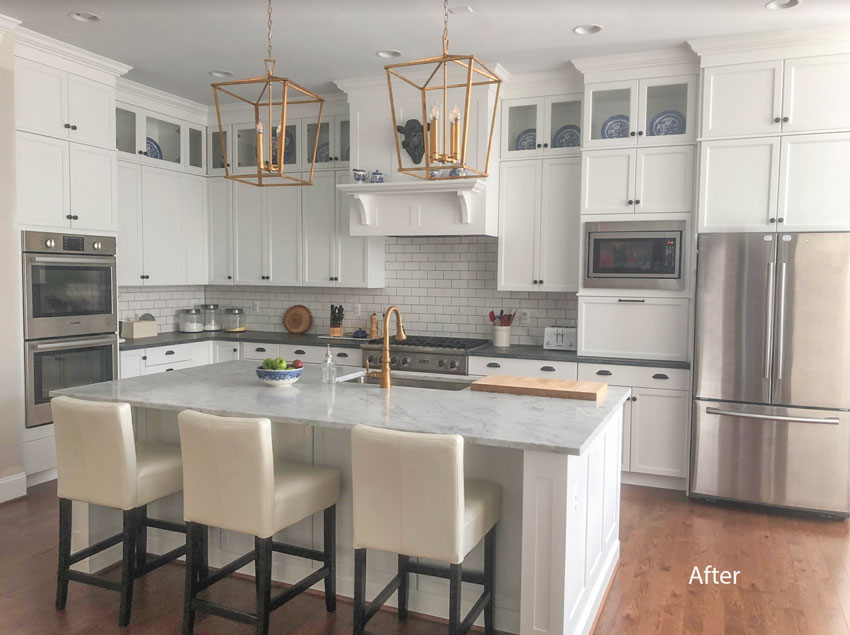
Before and After Kitchen Design
Let’s take one more look at the before and after of this reader kitchen refresh project. It really is stunning!
Here’s the before:
And the After:
When it comes to kitchen design details that matter, what else would you add? Tell me in the comments below.
In other news, I just celebrated 35,000 followers over on Instagram! If you’re not following me over there, you should. You’ll find more design advice on my stories every day!

PS. My mini-golden doodle Lucy is 5 months. She has discovered the front window and she looks almost like a person the way she’s leaning against the back of the sofa!
My new living room makeover reveal is coming soon, just waiting for one more piece of furniture! As you can see, we prefer the poodle clip to the scruffy look although she’s darn cute in both!
Related posts:
If you’re Still not Learning You’re Dead

I enjoyed this post, especially your recommendations for how to add color and additional interest. I’ve been reading all of your kitchen posts, hoping to find one that addresses an issue I have with my kitchen space. My home has a very open floor plan, a kitchen with 35 foot vaulted ceilings. One side is below a catwalk so only a couple of feet of wall show, however the opposite side is all wall from the crown moulding to the peak. The previous homeowner decorated atop the upper cabinets with statuettes, lighting, and various faux florals to try to fill some of the vast blank wall space above, but that is not a look I favor. So, what would Maria do?
I am in a similar situation and would love for Maria to reply. I boxed in the area above my cabinets in my previous home, and it did wonders. But I am unsure whether boxing in is the answer with the ceiling vault.
Agreed! I have really tall ceilings and unsure what to do
Do you have enough other storage to remove the upper cabinets and do some open shelving?
Looks wonderful! Great job for a diy’er!! I have a similar set up in my kitchen where the fridge and stove are on the same wall but my kitchen is much smaller. I have debated taking my cabinets to ceiling due to the size of my kitchen and because of my over the fridge cabinet which is humongous as I would have to do exactly reader as done and put two. But this is the route to go now that I see this kitchen. My big concern is weight as we have metal studs here in the walls in the south and not the traditional wood studs you have up north, which I feel are superior when anchoring heavy cabinets to walls although I have been told otherwise.
I just love this post and how well you explain everything! (and off course all of the updates and “details” made by this homeowner).
Thank you so much for sharing, this is very helpful. I also enjoyed your e-book and I now I want to keep learning.
Looks wonderful! Great job for a diy’er!! I have a similar set up in my kitchen where the fridge and stove are on the same wall but my kitchen is much smaller and ceilings are 12 ft. I have debated taking my cabinets to ceiling due to the size of my kitchen and because of my over the fridge cabinet which is humongous as I would have to do exactly reader as done and put two. But this is the route to go now that I see this kitchen. My big concern is weight as we have metal studs here in the walls in the south and not the traditional wood studs you have up north, which I feel are superior when anchoring heavy cabinets to walls although I have been told otherwise.
Beautiful.
BRAVO!
The blue ceiling softens and finishes the whole kitchen so perfectly.
I hope she agrees.
LOVE IT!
The reader did a nice job. The only thing I’m not crazy about is the dark knobs. Not sure what else I would
do, maybe white or gold (?) With black knobs, my eyes go to the knobs instead of the overall look.
I think the dark countertop was a good idea for some contrast against
all the white, but I’ve never heard of soapstone. Is it considered classic? What color is this, exactly,
black, or gray? Thanks for the post.
Soapstone is a traditional stone, especially in Northeast USA. It comes in many varieties and varies from grey to black with lighter veining. Most have a green undertone, but ours is more blue. It is the material lab benches are made from. Very heat-stable and unable to be stained, but very soft. It scratches easily and develops patina over time, particularly in high-use areas. Not for everyone – if you expect things to always look perfect and new it would be a poor choice. Personally I love it! It contributes to the timeless character of our kitchen.
No to the blue ceiling . Styling with pops of color for this kitchen. She did a wonderful job.
Exactly!!! No to the blue. That would look weird and terrible. She can add pops of color w plants and other accessories on the counters. I don’t know that I love the clean chairs instead of warm wood one. The owner did a wonderful job!!!
Maria – she did a great redoing her kitchen .‘I’d probably add some flowers r plant to the island
Add some color decor to the countertops
Along with some wood accents
Like wood cutting boards
But the great thing about what she did .’is that kitchen doesn’t boss her around .
She can add what ever her heart desires .
For color r decor.’
I love your readers new kitchen! I too am remodeling my kitchen with the help of your blog and eBooks. After reading this post (and many other gems on your blog) I suddenly “see” all my mistakes (It helps being a Clairvoyant!). I would’ve done things differently and boxed in my cabinets up to the ceiling on the wall that has 9 foot ceilings. I also would’ve chosen no uppers on the side wall where my stove and refrigerator are because we have an open concept kitchen, dining and living room with vaulted ceilings on that side making in impossible to box them in. I would bring subway tile all the way up to the point where the ceiling meets the hallway entrance and leave the rest of the angled wall painted and also bring the subway tile up to the ceiling on he 9 foot wall where my kitchen sink is to make it all look deliberate. I’ve got kitchen # TWO sitting here in boxes (6 months into this crap after demanding they replace the shoddy previous kitchen delivered back in June) in my kitchen from a local big box store that was delivered a week ago and waiting to see if they’ll replace some of the doors and cabinets that were damaged during shipment and some of the doors where the paint finish just isn’t up to par.
Maria, even with all the mistakes I’ve made, I STILL will have a kitchen that is a cut above average and after all my kitchen mayhem I will at least have a classic and timeless aesthetic in my kitchen! Many thanks you for writing the eBooks and this blog!
Maria, I have one question: I know you say to repeat a finish at least once, twice max. I have a black countertop and black pendants in my open concept kitchen, dining, living room /foyer entrance. Can I do my cabinet pulls and knobs in black (repeating it twice) or is it too much black because my stainless steel appliances have some black in them and we also have a huge black tv on a black console in the open concept space as well? Along with my appliances, the sink faucet is spot-free stainless. My floors are medium brown LVP and shaker cabinets are white. I feel like I should do brushed nickel although the matte black cup pulls and knobs are beckoning me and I like them better than brushed nickel. I’m trying to have some restraint here! I’ve also thought of doing gold hardware (my black pearl granite countertop has some very subtle gold flecks throughout) and after seeing this readers gorgeous kitchen, I want to do gold even more now, but is that too many metals to put together, black, stainless AND gold?
Maria, you could do a post on “Black is Beckoning ME!” and use me as your muse.! Haha! 🙂
Do black pulls. You can always replace them down the road if you hate them. There won’t be too much black.
Gg, I responded to your comment and it ended up in the main thread. HUH, this has happened twice. Anyway, thanks for the suggestion!
I would absolutely do chrome or gold, I’m over brushed nickel it reminds me of the brown trend. If you kept going with the black it would scream the black trend without question. It’s the end result we all need to keep in mind, not our current obsession with something trendy. Good question!
You can do chrome with stainless steel appliances? I wasn’t sure if the metals were too close. I know satin nickel and chrome are a no-no. Didn’t know if the metals were too close to try that! What about bedroom and bathroom door knobs? Should I do black? I haven’t seen any chrome door knobs. I was going to do satin nickel and my husband bought a pack. He brought it home and I think it looks cheap as hell! I’d rather the shiny gold door knobs I’ve had for the past 28 years if it came down to that and trust me, shiny gold will never have a place in my home again, matte gold, yes.
Me too Holly! Black is beckoning me as well! I currently have planned for black tar (Benjamin Moore) bottom cabinets in my kitchen, light gray (even though it’s “out”) upper cabinets and black handles and pulls…I love black light fixtures and was even considering black doors and trim in my currently being built home…but now I’m getting dazed and confused! Will it be too much black? Am I making a mistake in ordering $48 000 (Canadian $) of “trendy ” or maybe not “trendy” cabinets? I have to live with this forever! Seriously, I’m 52 years old…I won’t live to see new cabinets! Maria, can you advise me? Or anyone else? LOL
Carla, if you haven’t purchased both of Maria’s eBooks, I highly recommend you get them. Worth. Every. Penney. She gives advice on colors, finishes and even kitchen hardware and so much more.. Maria explains to tread lightly with black, repeating it once, twice max. I contemplated going with black door knobs for my bathrooms and bedrooms (my doors and trim are all being painted BM Oxford White to match my kitchen cabinets) but I think that might even be too much. The last thing I want is to be painting doors and switching out door knobs which can get expensive.
Here are a few blog posts that will help you out. 🙂
https://mariakillam.com/dos-donts-painting-doors-black/
https://mariakillam.com/what-ikea-knows-about-black-kitchens-that-you-dont/
https://mariakillam.com/perils-decorating-with-black/
https://mariakillam.com/how-to-decorate-black-white-bathroom/
https://mariakillam.com/what-everyone-should-know-about-black/
Thanks Holly I appreciate your comment! Maria
Unless your kitchen when it’s finished could literally be featured in a magazine because even though it’s trendy, it’s so beautiful, then maybe. If not, I would say you will definitely NOT love it forever. This is my third trend cycle, I know what I’m talking about.When the next trend after black comes along it will look so much better (because it’ll be new) than this trend does, you will regret it. Hope that helps, Maria
This is a fabulous “no demo” reno. I think adding blue (like the shade of the chair with interest) to the island would also enhance the overall design and this would work with the owners off white stools or a mixed blue and off white stool.
For me the off-white stools stick out like a sore thumb against the clean white cabinets. That color is not repeated anywhere else.
The stools are on her radar as she made the same comment.
Thanks, Hannah! That’s exactly what I’m planning. We have young kids so I don’t want anything too dear. The white leather stools have been workhorses for the last 5 years and are still in great shape. I’m going to do a blue and white patterned (floral? stripes? not sure yet) slipcover so we can keep using them.
Love this kitchen upgrade, and also your idea to paint the ceiling and add coordinating chairs. One question though – where does one procure a custom hood?
This is the diyers dad, we built the hood cover in place around the chimney hood. It was quite easy. The two sides first secured to the back wall and adjacent cabinets then the front then trimes it out.
Beautiful job, Peter! Very inspiring!
Thank you so much for that information. I’ve often wondered how one can make something this pretty on one’s own. It really adds to the kitchen. Also love the cabinet added below the microwave – wonderful way to hide appliances, clutter, etc. Lovely transformation.
Wow, that hood cover looks fabulous! Great job!
It was an easy project for my talented dad, but would be pretty challenging for a beginning woodworker. A carpenter or contractor could build one – our neighbors were quoted ~$7000 for a simple custom hood 😱
I pondered that idea too, but then I’ve obviously been back and forth over it. I figure one option is if get black cup pulls and knobs and later on I get tired of my light fixtures, I can always replace the light fixtures in a different finish and the cabinet hardware can stay. I’ve found I’m super picky about what I like. My husband keeps reminding me that once the holes are in, if I want to replace the existing hardware down the road, I’ll have to be able to find handles or cup pulls that will match the holes from the existing hardware. Then I say oh crap, should I just do all knobs? that is very tempting and then I wouldn’t have to worry about whether or not the knobs “talk well” with my light fixtures which is hard enough. I have always been in LOVE with the look of classic cup pulls and said if I ever got the opportunity to have them in my kitchen, I would.
That’s what I did with my new shaker style kitchen cabinets, all knobs, and I’m very pleased with the look. But also note the placement of the knobs in this beautiful kitchen, just above the rail and not below or in line with. Putting the knobs below the top rail edge is a less current look, in my opinion.
I’ve noticed placement of hardware and some I like, others, not. I will definitely have to check that out. I think I found information about that on pinterest somewhere….
Emily Henderson recently did a nice blog post on hardware placement.
I checked that out! Thanks, Lisa!
Here’s a couple of articles
https://www.sandiegohardware.com/post/the-ultimate-guide-for-cabinet-hardware-placement-and-sizing
https://www.mockett.com/blog/blog-2017-hardware-positioning
https://www.schoolhouse.com/blogs/how-to/how-to-choose-the-perfect-cabinet-hardware
Thank you, Cheryl! 🙂
Maria, I love the added blue ceiling and bar stools! If I didn’t have an open concept space, I totally would’ve jumped on that suggestion. It draws even more attention to her beautiful light fixtures and faucet. The devil is in the details for sure!
The reader did a beautiful transformation should be very proud of their kitchen. It’s an A+ kitchen.
One correction Maria. The reader did not start with a cherry kitchen as you stated. Those cabinets are maple or possibly alder. To many, it may seem a trivial distinction, but I believe it enhances an interior decorator’s or designer’s credibility when they can properly identify the wood species commonly used in cabinetry and other case goods destined for the home.
Maple is what the doors are made from and we duplicated this with the upper doors.
Absolutely gorgeous kitchen! What color grout did you use in the subway tile?
Delorean grey.
Beautiful transformation. It would be interesting to know the cost…
We have about 6k into the painting and an additional 8k into materials. A professional did the counter tops, we did the rest ourselves.
Maria, this is another BIG question. I’m obviously renovating and in the process some things have come to mind. Is what you describe as “Classic and Timeless” along traditional style lines? This came up when I was selecting a kitchen faucet and am in the process of trying to decide on kitchen cabinet hardware. I read somewhere that the lines should coordinate and it started to make me contemplate things… Firstly, I live in a raised ranch home with no ceiling moldings or millwork. I like a clean, simple look and a have realized modern is not my style. I chose the “Traditional” Edison stainless steel faucet from Moen. My light fixtures are Transitional. My furniture is comfortable and casual and I have a farmhouse kitchen table that I purchased 20 years ago. I raised my two daughters with it and still love it. I will refinish the table top and paint the remaining wooden chairs and table base .What if your reader wants a Classic and Timeless kitchen but has modern design aesthetics or likes Mid Century Modern, Transitional, Contemporary, Rustic (which I think I lean towards) etc…? Do you mix and match styles or have to keep everything Traditional/ Classic or are they two different things? What am I missing here? Can you clarify please?
In general, one of the biggest mistakes people make when renovating is mixing modern and traditional where it shouldn’t be. For example, I was recently in a house where the bathrooms were traditional (tuscan trend era) but every faucet was a super modern and looked really out of place in those bathrooms. Your question is big and can’t be answered in a comment unfortunately, but there’s an example, hope that helps, Maria
I guess the question o was really asking was is your definition of classic and timeless described as traditional style? I feel like there are two kinds of traditional; classic and simple and Then there’s more ornate traditional style with tons of intricate milk work and Moulding. But then again I could have my interpretation of what that means all wrong… A modern faucet in a Tuscan bathroom I would notice immediately as being out of place for sure!
Beautiful kitchen renovation!
Because of my love of all things whimsical, I love love love 😍 the cow head above the stove hood! (Am I the only one??) It’s the first thing my eyes landed on and brought me so much joy…. What an inspired detail placement!
It is obvious you are a very thoughtful and talented Father! Great work by all of you.
That describes him perfectly! And a tireless worker.
So glad you appreciate the cow! It cracks me up. I love it.
I love this!! I did something very similar in my kitchen also. I would have loved to take the cabinets all the way to the 8′ ceiling, but when the house was built 20 years ago, ceiling borders were installed around the perimeter of the open concept kitchen/living room. So taking the cabinets all the way up would have cut the borders off and it would have looked weird. Plus there is an air vent above another bank of cabinets that would be obstructed/blocked by a cabinet. So frustrating. The only way around the ceiling border issue would have been to either completely dry-wall over the existing ceiling (I didn’t want to deal with drywall dust). At any rate, I am still happy with the finished result and most of my choices are due to reading this blog and buying the e-books. I am registered in the course at the end of the month and can’t friggen wait!!!
Beautiful! So lucky to start w a good layout and cabinet style. Love all except the gold, just jumps out at me and not in a good way. Seems like that trend has run it’s course. IMO.
Lovely timeless kitchen!! Thanks for sharing and describing the details that make it timeless. Your reader did a beautiful job!
Maybe paint the island cabinets a dark blue (match the plates?) and get some stools that have blue fabric with a touch of gold print. I’m not a fan of painting the kitchen ceiling, especially if they have an open floor plan.
For someone just starting their kitchen design, I’d suggest a plain frieze between the cabinets and the ceiling instead of stacked cabinets. Here’s an example: https://carolineondesign.com/how-to-fill-space-between-cabinets-and-ceiling/ I did this in my kitchen because I can’t reach the stacked cabinet and didn’t want a row of 12 x 12 glass cabinets. Also saves $$. I would add plain glass doors (no grid) to a few of the upper cabinets, too.
I love this kitchen renovation! My absolute favorite thing is taking the cabinets to the ceiling. I also love the range hood cover. Kudos to the team that did the planning and execution. Maria, I love those stools from Ballard Design and think they would look fabulous in this kitchen.
Stunning makeover! Kudos to you and using all of Maria’s wisdom!
Maria–We recently finished our kitchen makeover (and, “yes” I studied lots of your posts and ebooks)–sheepishly admitting I love my “stove pipe” vent like this owner’s “before.” And, used brushed nickel knobs and pulls, which was a process of elimination since I didn’t want gold or black… I do have gold pendants, chandelier and soap dispenser.
Another important functional update was adding deep drawers to the lower cabinets on either side of the range.
Bonus detail: their two cup handles over one drawer handle make a cheerful smiley face (◠‿◠)
Beautiful makeover and a perfect example of a kitchen upgrade which is timeless! Like Gina I love the touch of the cow head. You could easily introduce other pops of colour to this kitchen, especially in those upper glass cabinets- the ceiling colour might not be necessary! Metallic gold has been trendy but personally I like the gold tap and lights, they add warmth- and as a minor decorative touch you could a little special gold something to that wonderful shelf above the rangehood as well.
It came out gorgeous. Definitely great inspiration for me as we plan our new kitchen. I’m wondering where I can find the cow head? Lol :)))