


It’s a well known thing – designers who can immediately see what any space needs, will still spin when it comes to making selections for their own home. After all, the more options we know we have, the more time it will take to decide.
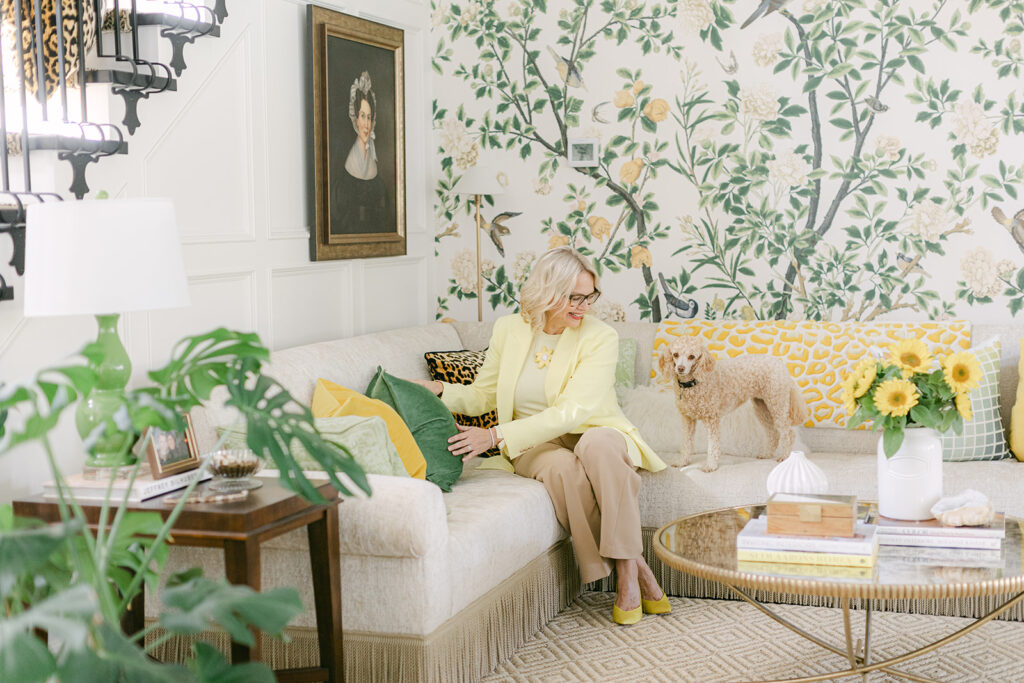
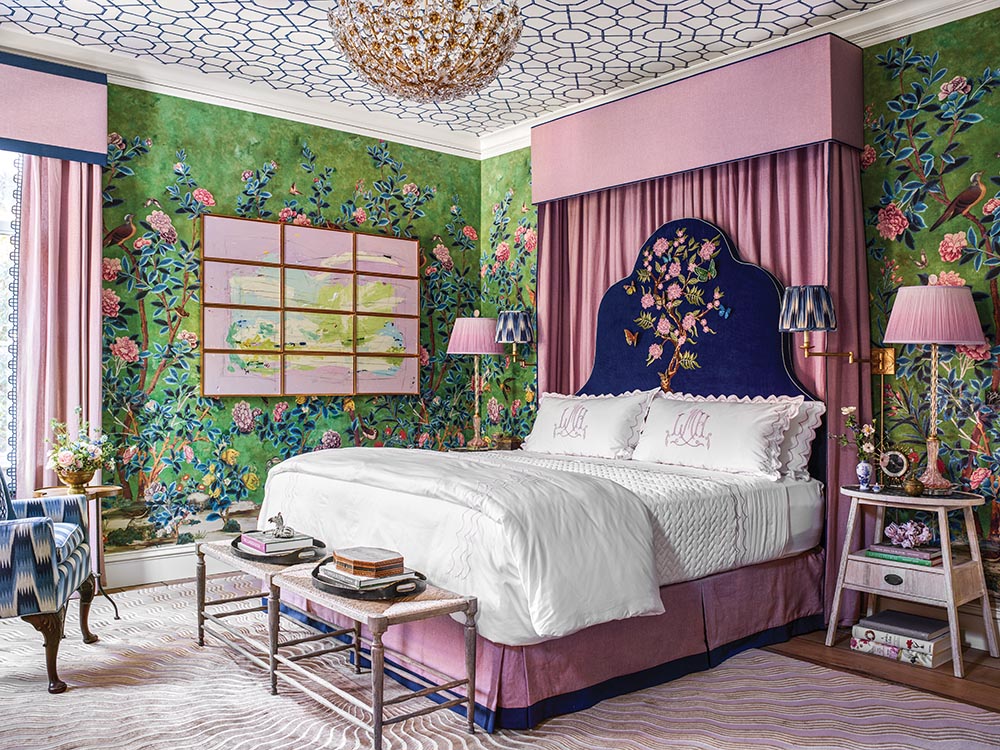
My good friend and talented southern designer Lisa Mende actually sourced the wallpaper in my home (above). She was using it in the pink colourway in a showhouse bedroom she was decorating (below):
In fact, I consulted with no less than 3 trusted designers to decorate my own home this last year and Lisa was one of them.
Because I knew, beyond a shadow of a doubt, that each one would see something I didn’t. And their take would be worth much more than their fee. Well I was not disappointed!
And it doesn’t mean that my home is not my creation. It’s that I knew that it would be that much more fabulous with more than one expert perspective.
There are many ways to slice the budget in any home project, so the most important money you will spend is the part that makes it the most beautiful.
Because not only does every designer bring their own unique sources and creative ideas to the table, but even just a consultation with a designer you trust, to help refine and organize your ideas is worth the investment on its own!
And the same thing happens each week inside my community, via live design meetings with my team and me.
You can watch how we engage as a team in dialogue to think through and develop the best advice for clients’ projects.
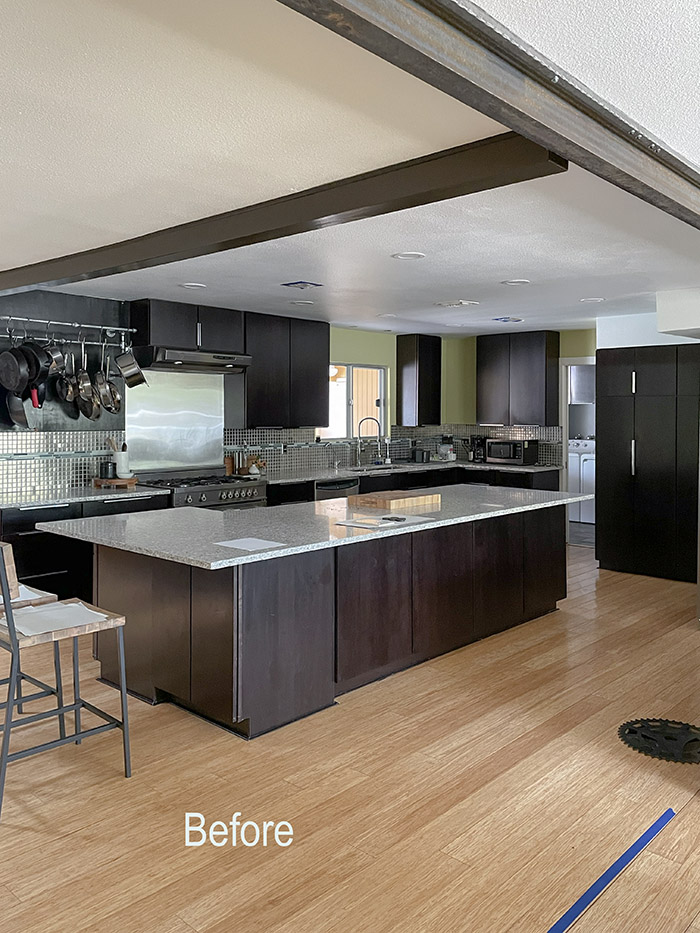
Ashley’s kitchen before
Likewise, True Colour Expert and designer Ashley Poe, knew that when it came to her own kitchen, she wanted to bring in advice from another trusted designer. She consulted with me via my popular Create a Timeless Kitchen eDesign package and I was delighted when she agreed to share her beautiful afters with you!
What an incredible transformation!
Here are the befores below. Notice how quickly a trendy wood stain like the dark espresso from the brown trend looks completely dated. If this was a timeless, natural looking maple kitchen, no one would be in a big hurry to update it.

Her wish list
The layout of her kitchen is good and functional, she wanted to paint the cabinets, update the hardware and details and bring her kitchen back up to date.
She wanted a lighter and brighter look with creamy cabinets, but to keep the grey granite and bamboo floors.
I knew that the countertops would look best with a contrasting colour. So while we also offered her a light warm taupe (to relate to the taupe window frames and granite), my first choice was to paint the cabinets a fun dramatic colour.
But with a deep cabinet colour, how will we make her kitchen feel brighter?
Keeping it light and bright
My team and I saw that with the generous layout of her modern kitchen, the best update would be to remove the uppers and replace the basic hood fan with a pretty plaster one. This way, the upper half of her kitchen would be crisp and bright with timeless white backsplash tile running the entire wall and a high contrast cabinet colour would look fresh.
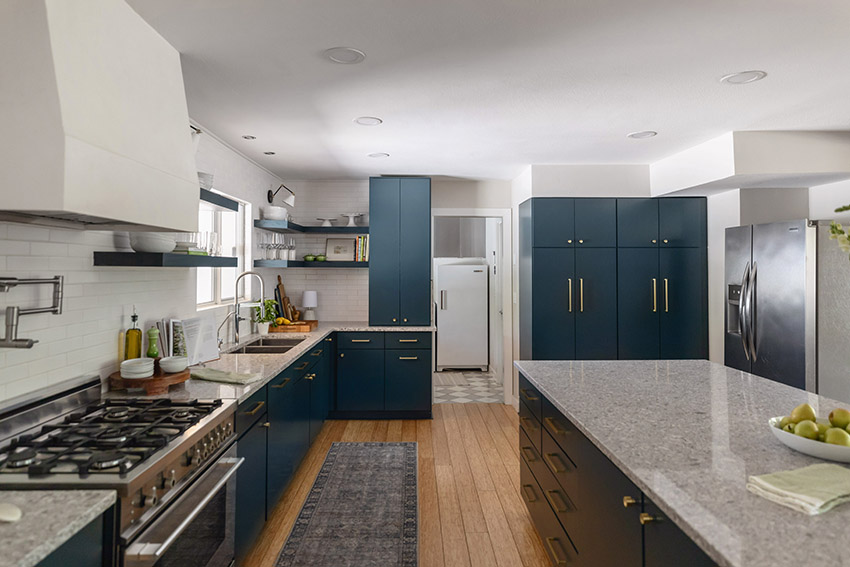
And she went for it! Here are the stunning afters!
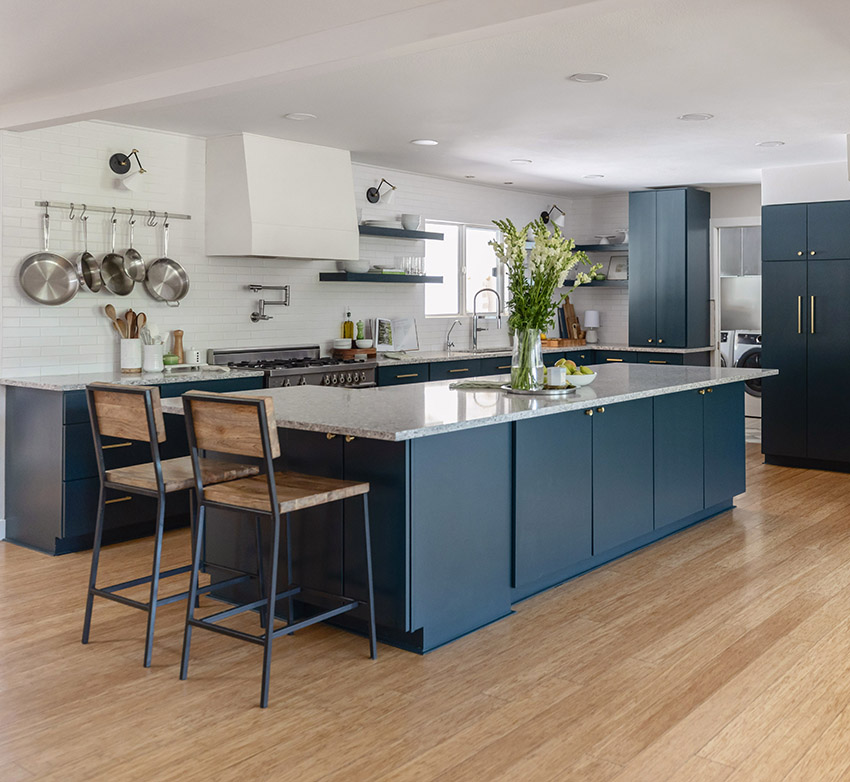
It looks like a brand new kitchen! I was immediately struck by how much better the granite looked. Going with a rich colour is a great strategy for updating older countertops. You almost don’t notice them anymore, just like the two kitchens in this post.
You can find some of the best blues and greens in my new Samplize collections here!
Why upper shelves in kitchens aren’t going anywhere
Upper shelving is a great way to add more space for styling, displaying your favourite serve ware and room for pretty sconces. But the biggest reason it transforms kitchens is that the window is no longer boxed in by cabinets, instantly creating a light and airy look.
Here’s the view to her open and bright dining area (below).
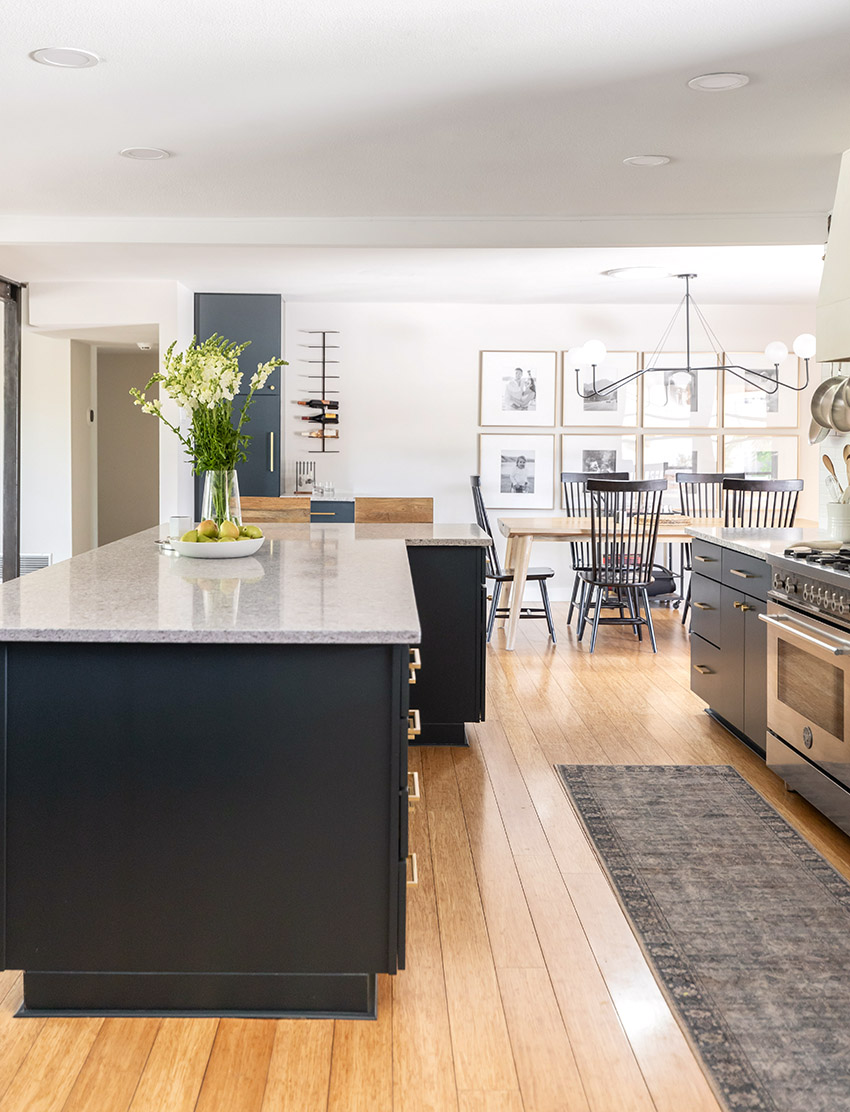
It looks like she was able to sell her hubby on brass hardware to achieve a sophisticated mixed metal look. She’s got silver plumbing fixtures to relate to the range, brass hardware that beautifully contrasts the deep blue green cabinets and relates to the warm floors, and a few hits of black, but not too much.
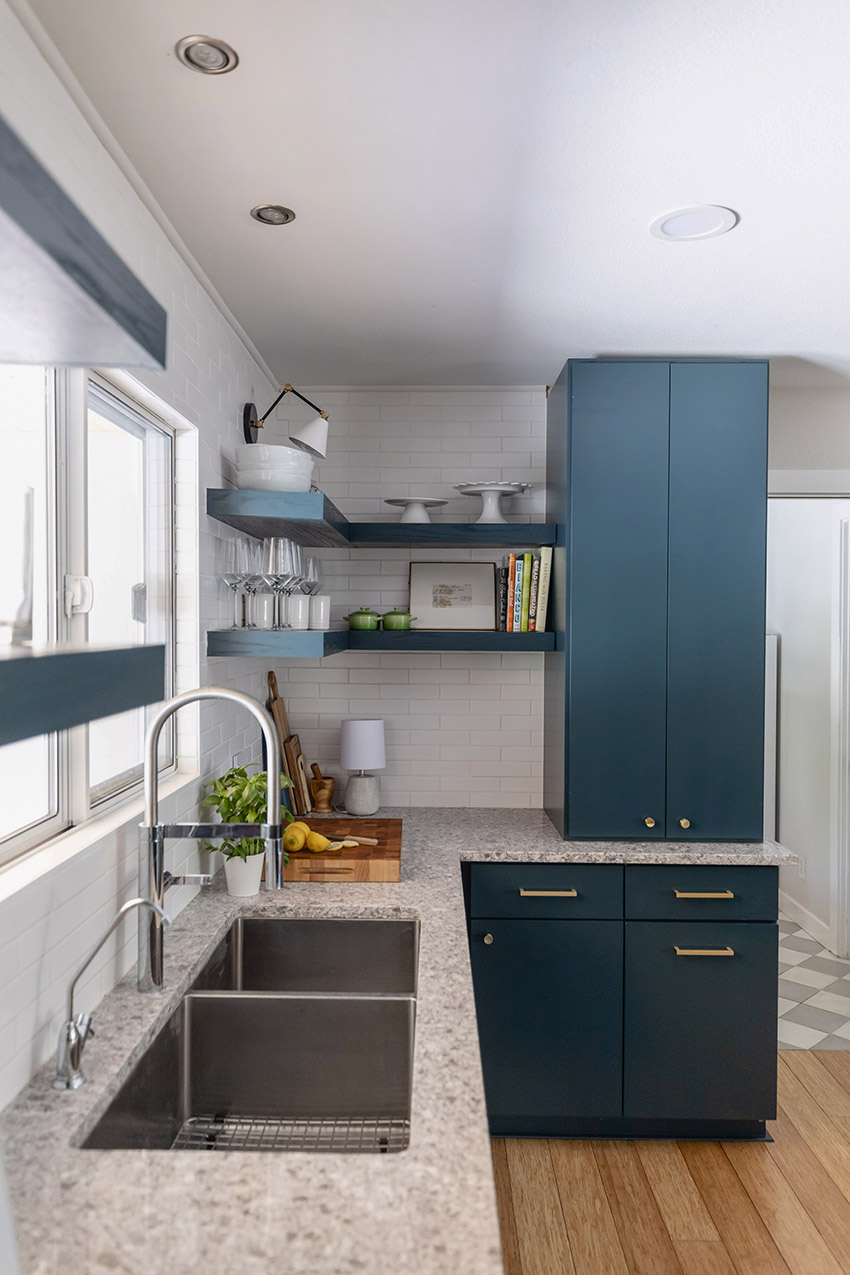
See that pretty adjoining laundry room floor? Originally, she was thinking black penny tile, but I’m so happy she ended up going with this pretty checker board tile that perfectly relates to her countertops!
Let’s take a quick look at that before again:
And the gorgeous after!
Amazing work Ashley! It’s a delight see you each week in my True Colour Insider community 💛
Join us! The eDesign meetings in my community are live for True Colour Experts, but the replay is available to the middle tier membership, Colour Designer. Learn from my team and I and make connections with other like minded designers and enthusiasts. Because there’s nothing more effective than informed advice and feedback.
If you’d like my help with your kitchen project, here’s my eDesign Create a Timeless Kitchen package.
And if you’re looking to paint your cabinets, you can find the best warm neutrals, the best whites and the best curated colours here in my curated collections for Samplize! You don’t have to stare down the entire fan deck, I’ve found all the best ones for you!
Are you a designer or are you tackling a home renovation project?
Do you have a team or a trusted confidant to share and refine your ideas with? Do you poll a friend with good taste? Please let me know in the comments. I’d love to know!
NOW HIRING!
Click here for all job postings… we are currently looking for a Virtual Assistant / Project Coordinator.
Related Posts
7 Best Paint Colours for the Trending Warm Kitchen
The Trending English Country Kitchen: How to Get the Look
A Timeless Kitchen Refresh with Travertine: Before and After


Wow! Amazing transformation. I was thinking of removing my uppers on my window wall, but like the kitchen you are showing, my window is small and towards one side. I thought I would have to replace the window with a much larger/longer window to make it work, which would be beautiful, but would cost a lot more money. I would love to see a lot more examples of this. What’s a good way to search for pictures of more kitchens where the uppers were removed, but the window has not been replaced?
Not a fan of open shelving.
Open shelving is a transformative not to mention less expensive way of taking a builder kitchen and moving it up to 2025. After all we have open shelving in other rooms in our home that’s why it also works in a kitchen to make it feel more collected and like the rest of the rooms in the house.
Thanks for your comment! Maria
I agree. It’s hard to keep clean near a stove where steam will take its toll. While it can be pretty, it’s not that functional. For those of us who actually use our kitchens, that has to be a consideration. I’d rather have nothing there instead of shelves, which would be a very nice open look. I would also pass on that expensive pot-filler over the stove because you still have to take that full pot off the stove to dump out the water, so it really is not a great use of money.
I use a water pitcher to fill my pots!! Don’t have to worry about carrying a heavy pot to the stove or don’t have to worry about a rarely used water line breaking. I do have to empty them in the sink, but I am okay with that!!
Open shelving looks pretty but one wonders where all the dishes/cereal boxes/spices end up. I think most people wish they had more storage not less–and I’m so glad I don’t have to dust all my dishes.
This is so perfect! Beautiful transformation!
We are still rehabbing a 80’s house in GA . There were tiny rooms, small windows, no light., and felt very choppy. Needless to say, I made Jay take out every wall and every hanging cupboard. I also vaulted the rest of the ceiling only to include the kitchen. So, one half of entire area is vaulted, and half is not. It looks so great! instead of cupboards, Jay is boxing in a huge wall space for a pantry. Like a huge closet with sliding doors and gobs of shelving inside. My goal is NO MORE CLUTTER! Have spent hours online to find what is in my head, but has been worth it. Things still not complete and we are into rehab, year 2, due to unforeseen circumstances. Licensed contractors are a big problem for us and I have fired many after they ghosted this house and seem to understand, but then don’t show back up. How this needs to be is one thing I will not let go of, and will complete this or else! BTW, I’m 71 and don’t care…:)
Rip off the cupboards, woman! Feel how different the light is and how the space feels. That little window will just be a memory…Consider getting a free standing pantry cupboard or something similar for dishes, etc..Measure, measure, measure!
Good luck.
Well executed Ashley! It looks fabulous 💛
What a great blog. So thrilled to hear that even a great designer, Maria Killam, sought another expert on her home project. That has been my issue. Always feel that I need advice and validation before I pull the plug on a project. But I seem to seek the advice of designers, highly recommended, that do not listen to my needs or the style of my home. So then I have wasted money that could have gone into the project. Story of my life.
Thanks Maria for sharing a personal experience.
Painting that dark ceiling beam really lightened the look of the kitchen. Changes to dining area especially appealed to me.
Beautiful transformation! Love the color (What color is that?) of the cabinets and the whole design. So fresh and lovely. Is the microwave hidden in that new cabinet that sits on the counter? Would love thoughts on microwave placement.
I was wondering about that and the coffee maker!
Agree! Where is the microwave? Maybe built into the cabinet (which becomes awkward having to keep doors open)? Around the corner in the laundry room? Or perhaps they decided they didn’t need one?
It looks much like BM Van Deusen Blue
I’m curious about the ceilings. My eyes went straight to them in the early photo and I was looking forward to seeing how to deal with updating to “flat” ceilings. It was a deal breaker for me in house-hunting, because I couldn’t imagine how to cope with the difficulties of removing the textured finish. Was finishing the ceilings a consideration that was just too much to add to the project? (or am I alone in textured-ceiling-aversion?)
The choice of colors is beautiful — well done! I’m not a fan of open shelving, though — it’s impossible to keep everything clean and attractive. I’m also not a fan of hanging pots and pans on the wall. Within a few weeks, the wall will be dinged and scratched. And, unless someone scrubs the pots until they sparkle, every single time they are used, it’s not pleasing to the eye and just becomes visual clutter. One of those low drawers would be perfect for the pans. Finally, I love the cookbook nook.
Exactly!
That kitchen went from
Blah to a breath of fresh air .
Love the new color …
Looks so
Much better
Can you share what blue you used? Thank you
All the paint colours from my home and also Ashley’s cabinet colour can be found in my new community where everyone should be! You can join right here: https://mariakillam.com/truecolourinsider/ Maria
This is a great transformation!
The kitchen looks so much ore streamline without all the singleton cabinets scattered along the wall. I like the openness. There is a lot of storage in the island as well as the pantry. I think, in a kitchen this large, I could live without the upper cabinets.
As a cabinet designer, I have one critique. I would have streamlined the toe kick space on the island. I do not like that the toekick goes from inset to flush to inset across the side and back of the island. It makes the cabinetry appear cheap. Fashion a baseboard molding to fill in the inset toe so that it is flush with the doors on the three non working sides of the island. This will not interfere with the doors. The island will look instantly custom.
Completely agree. My eye immediately gravitated to the base details at the island. I appreciate the refinishing of the existing cabinets that remained, however, adding base molding to the recessed toekicks, as Rebecca said, would upgrade the kitchen to a more custom feel.
What a great eye you have! That’s the perfect solution.
Since the cabinet doors are overlay, you might be able to add a faux door to the end for continuity?
This transformation is beautiful. So many strategic choices that made all the difference!
Two or three heads are better than one!
Many years ago, I worked at a high-end furniture store. They hired a general manager who had experience at a respected national chain of furniture stores. She said they used to give design challenges to interior designers applying to work there. The sheer VARIETY of the finished results never failed to amaze her.
Wonderful transformation. Kitchen saved.
Great transformation. Gorgeous color and I’m a fan of open shelves. I have had open shelves next to my range for the past 15 years. I keep coffee mugs and small plates on the lower shelves. The upper ones I use to display art and seasonal/holiday decorations. It’s easy to keep clean and organized.